We had some fun this week. It was short and I didn't get to do all the things that I wanted. I still had to work on Monday. My son had swim lessons all week. Plus, the dentist. A play date for my daughter. And, it got really hot around here. But, we still have one more day before the week is over.
What we did...
Made dinos out of paper plates. Got the idea from here. I just found a site to make paper plate T-Rex's, which my daughter so desperately wanted to make. I think we will have to do that one tomorrow. My son decided to turn his dino into a rainbow.
All you need for this is...
1. paper plates
2. markers/paint/crayons
3. brass fasteners
4. hole puncher
 |
| Mine is to the left. My daughter's to the right. My son's "rainbow" is up on top :0) |
Our next adventure was to break open some ice fossils. Got that idea from here. I stuffed toy dinos into balloons and added food coloring and water. Froze them.
Then the excavation began. The kiddies donned their hard hats. Got those from Oriental Trading--left overs from my son's birthday party. I bought safety glasses for them and I am so happy I did. I got a 3 pack from Home Depot for around $7.00. I got some hammers and they went to town.
Ice went flying everywhere. So the safety glasses are a necessity.
I think tomorrow I am going to try my hand at making some DIY fossils. Idea from here. All you need is
1 cup flour
1 cup dirt
1/2 cup sand (play sand works the best)
1 cup water
12 tiny plastic dinosaurs
Plastic wrap-lined cookie tray
Mix everything together adding more flour/dirt/sand as needed. Coat the dinos into the mixture. Ball them up and set them in the sun to dry. Sounds easy enough, right? I will let you know how that one goes.
Since it was so hot today, I wanted to do another fun ice activity. Having ice freeze in balloons took too long, so, we decided to ice paint. Idea from here. She froze water colors. I froze food coloring and water because that was what I had. I was also thinking about freezing unsweetened Kool-Aid. I think I will do that tomorrow too.
I let the kiddies fill their ice cube trays. Surprisingly my son did a good job. I was quite rightly impressed. Got the star trays from Walmart and The Dollar Tree. I couldn't find my red food coloring, so we could only work in blues, greens and yellows.
After the cubes were frozen, we took them out in the back yard and painted.
Of course, my kids decided to eat the ice cubes, which was fine. I am glad I used food coloring instead of paint.
Oh, and if you attempt this, make sure you put them in clothes you don't mind getting stained.
We also just let some ice paints sit and melt. With the heat they melted in no time and it looked pretty cool too.
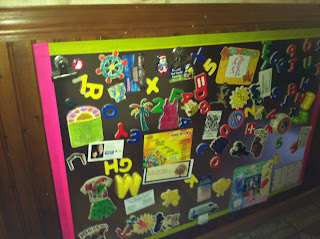
********************************************************************I have to add in, while I was in Home Depot buying the safety glasses, I also bought some sheet metal. I got 3 sheets--$9.54 (I believe) each. The edges were sharp, but I taped them with some decorative duck tape (The Dollar Tree). I adhered them to one of my kitchen walls with 3M tabs. So far they are sticking well. Now I have 3 magnetic boards in my kitchen. My husband is quite happy--all the magnets are off the fridge.
I know, pictures not great, but you get the idea. The one on top is actually on the bottom of my kitchen wall. The kids can easily access that one. My 15-month old is having a blast with it. The 2nd pic, is of two, one above the other. I have the kids' calendar there. I am going to set up a weather station too.
The thing that makes these so great besides being magnetic, they will also double as dry erase boards!
My blog for this week is done. I will add more on how my DIY fossils went. TTFN!


No comments:
Post a Comment